Login form testing using React Testing Library


React Testing Library
The react-testing-library is a very light-weight solution for testing React components. It provides light utility functions on top of react-dom and react-dom/test-utils, in a way that encourages better testing practices.
So rather than dealing with instances of rendered react components, your tests will work with actual DOM nodes. The utilities this library provides facilitate querying the DOM in the same way the user would. Finding form elements by their label text (just like a user would), finding links and buttons by their text (like a user would). It also exposes a recommended way to find elements by a data-testid as an "escape hatch" for elements where the text content and label do not make sense or is not practical.
This library encourages your applications to be more accessible and allows you to get your tests closer to using your components the way a user will, which allows your tests to give you more confidence that your application will work when a real user uses it.
Testing Login Form
This is a very basic login form.
- Input will be validated if it is not a valid email, it is going to throw an error, it will display a message.
- Function will be tested, the data that was input is correct, event clicking, event inputing and text changes.
Because you are going to use react app here, you don’t need to install anything else, it already comes with react testing library out of the box and jest.
App.jsx
import React, { useState } from "react";

export const validateInput = (str = "") => str.includes("@");

function App({ handleSubmit }) {
  const [formData, setFormData] = useState({});

  const handleOnChange = ({ target: { name, value } }) => setFormData((prev) => ({ ...prev, [name]: value }));

  return (
    <Form name="login-form" onSubmit={handleSubmit}>
      <FormItem>
        <label htmlFor="email">Email:</label>
        <input id="email" name="email" onChange={handleOnChange} />
      </FormItem>
      {formData.email && !validateInput(formData.email) ? <Error>Email not valid</Error> : null}
      <FormItem>
        <label htmlFor="password">Password:</label>
        <input name="password" type="password" />
      </FormItem>
      <Button role=”button”>submit</Button>
    </Form>
  );
}

export default App;
Validate Input Function
App.test.js
import React from "react" ;
import { render, fireEvent }  from "@testing-library/react";
import App, { validateInput } from "./App";

describe("login", () => {
    test("validate function should pass on correct input ", () => {
        const text = "text@test.com";
        expect(validateInput(text)).toBe(true);
            });
});
describe() create suite of tests. You don’t need to input it because it is part of jest. With describe(), you can add different tests which within those tests will have different checks and this will allow you to basically be able to debug our tests easier.
Here, login form is described, so you are describing the entire suite, the behaviour of this form.
describe() takes as parameter the name of the suite as first argument and second argument is a callback. In this case, the contents of the callback are more test statements. you can nest suites within suites.
test() describes the test itself. It takes as parameters the name of the test and a function that holds the tests.
expect() the condition that the test needs to pass. It will compare the received parameter to a matcher.
Here, a function is passed and expecting that its value should be true.
Now, to run the test, open your terminal and navigate to the root of the project and run the following command:
yarn test
or if you use npm:
npm test
In testing, you also want to test edge cases, you also want to make sure that this fails if you don’t give right information. So, you have to add one more test.
import React from "react" ;
import { render, fireEvent }  from "@testing-library/react";
import App, { validateInput } from "./App";

describe("login", () => {
            ….
    test("validate function should fail on incorrect input ", () => {
        const text = "text";
        expect(validateInput(text)).not.toBe(true);
            });
});
Testing DOM Elements
In this test, you will actually make sure that component is in the document.
import React from "react" ;
import { render, fireEvent }  from "@testing-library/react";
import App, { validateInput } from "./App";

describe("login", () => {
            ....
    test("login form should be in the document", () => {
        const component = render(<App />);
                         const labelNode = component.getByText(“Email:”)
        expect(labelNode).toBeInTheDocument();
            });
});
render() method is used to render a given component.
You are grabbing inputNode, react testing library is going to look at this inputNode by getByText and expects that the inputNode is in the document and toBeInTheDocument() is added assertion from jest dom.
Now, you have input and label, now you have to make sure that your labels and inputs are related to each other. And you can actually do that in a couple of different ways but because you have label htmlFor and there is relationship here between input label in for attribute and the name attribute, they should be related together.
import React from "react" ;
import { render, fireEvent }  from "@testing-library/react";
import App, { validateInput } from "./App";

describe("login", () => {
            ....
    test("email field should have label", () => {
        const component = render(<App />);
                        const emailInputNode = component.getByLabelText("Email:");
        expect(emailInputNode.getAttribute("name")).toBe("email");
            });
});
Testing Events
import React from "react" ;
import { render, fireEvent }  from "@testing-library/react";
import App, { validateInput } from "./App";

describe("login", () => {
            ....
    test("email input should accept text", () => {
        const { getByLabelText, getByText }  = render(<App />);
                        const emailInputNode = getByLabelText("Email:");

                        expect(emailInputNode.value).toMatch("");

                        fireEvent.change(emailInputNode, { target: {value: ‘testing’ }});

                        expect(emailInputNode.value).toMatch(‘testing’);

                        const errorMessageNode = getByText(“Email not valid”);
                        expect(errorMessageNode).toBeInTheDocument();

                        fireEvent.change(emailInputNode, { target: {value: ‘testing@’ }});

                        expect(errorMessageNode).not.toBeInTheDocument();
            });
});
Here, function is destructuring getByLabelTest , you don’t have to write component. Once function is grabbing that node, it is saying that the node should be empty.
Then,function is using fireEvent which is imported from the testing library and using a method called change and this is going to take emailInputNode and then grab the target value and change it to ‘testing’. Then it is going to expect that ‘testing’ was actually input to the emailInputNode.
Now, you actually have to test that the button was clicked, the button works. you will add spy which is a jest function that will essentially integrate itself into code and it will listen to any events that happen such as a click.
So, here you have a button and have submit, which means that when it submits it should handleSubmit which is something a function or a callback that we are providing as a prop.
import React from "react" ;
import { render, fireEvent }  from "@testing-library/react";
import App, { validateInput } from "./App";

describe("login", () => {
            ....
    test("should be able to submit form", () => {
                        const mockFn = jest.fn();
                const { getByRole } = render(<App handleSubmit={mockFn} />);
                        const buttonNode = getByRole("button");
                        fireEvent.submit(buttonNode);
        expect(mockFn).toHaveBeenCalledTimes(1);
            });
})
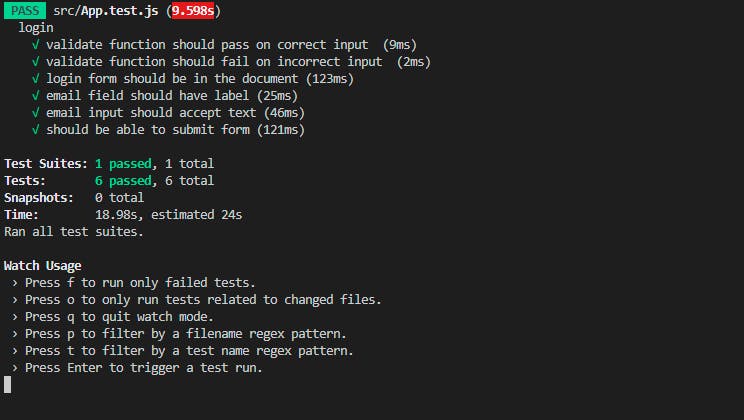
Output
run yarn test or npm test